HTML
BASICS OF HTML - FOR BEGINNERS
FORM ELEMENTS OF HTML/HOW TO CREATE A FORM USING HTML
Hello geeks,
Welcome to the fifth part of our HTML learning session . In the previous parts of this series we have already learnt about basic tags of HTML like - <html> , <body> , {<h1>,<h2>,<h3>,<h4>,<h5>,<h6> Heading tags} , <p>[paragraph tag] , <br>[line breaking tag] , <hr>[horizontal line tag] , <font> tag , <a> anchor tag , <img> image display tag , face tag , color tag , size tag , <table> tag .So , in the fifth part of this series now we are going to learn about different form elements used in HTML . By knowing the name you have already guessed about what are form elements and where they are used , if not? then nothing to worry about it because i will cover whole topic and explain all scenario of tthe form elements in HTML - what are they? and why to use them?
So , without wasting more time now we are going to learn it .
WHAT IS FORM ELEMENT?
Form elements are the most important part of any web page because without the use of the form elements you can't able to create any login form or registration form or say any other forms. In the creation of the login form or registration form we have to use form elements .HOW TO CREATE FORM ELEMENTS?
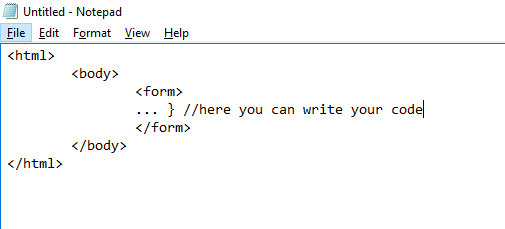
For creating form elements first you have to use <form>...</form> tag . This tag is used inside the body tag as you can see in the the below image .
NOW,
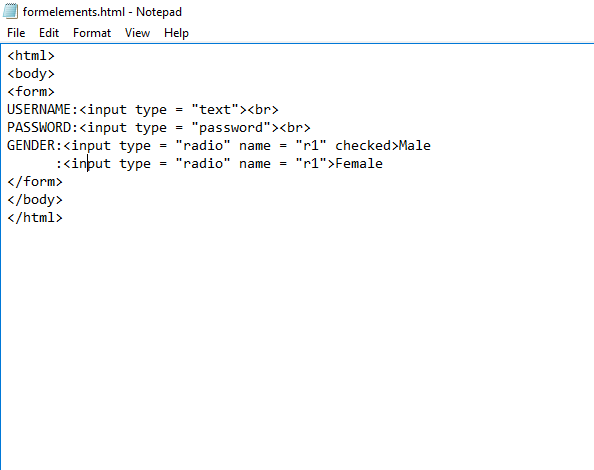
We are going to use form elements and create a form . In the image given below you can see that i have written a HTML code which is gonna create a form .
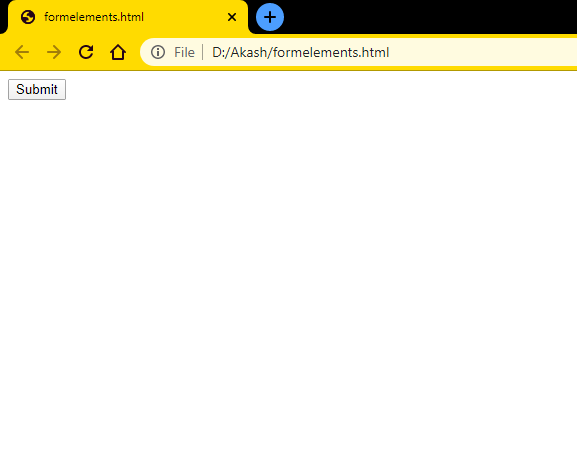
This is the output of the above code .
Now i am going to explain above code -
* Here you can see a line <input type = "....."> this line is used take a input from the user of your website . From this line you can able to take any input like password , email etc. means through this line you can able to give an option to the user like if you want take input of his or her age or gender then you have to use this line as you can see in the above pic how i asked my user his/her gender (male/female) .
* <input type = "text"> this line is used in the above image to take the input of his/her username . This line is able to take character as well number in the username field .
* <input type = "password"> this line is used to take the password input from the user . There is a feature in this line that if you enter any digit or character immediatly it shows * in the place of that digit or character . This is similar to the facebook , instagram and other social apps' features during filling passwords .
* <input type = "radio"> this line is used to create a circular box which is used to select an option as you can see this feature in the above pic while selecting your gender .
NOTE - In the above code there is problem you can see if you execute this code by yourself . while selecting gender option this code permits you to select both gender male and female at a time but you know how can someone is male or female at a same time :)) . So , here we can create a small correction or say enhancement in the code that it will restrict you to not select both male and female at a same time .
Now you can see in the above code that we have enhanced our code and there is line like this GENDER:<input type = "radio" name = "r1">male and then there is a next line <input type = "radio" name = "r1">female .
I am going to explain this line in simpler way - let us consider a box named r1 which is able to store only one thing at a single time if you put then female can't be stored in it and if you put female then you can't able to store male in it . In the same manner this line is functioning here .
The output of the above code is given in the below image .
HOW TO CREATE A CHECKBOX USING HTML?
What is checkbox ?Checkbox is a box used to select different things at a same time opposite of radio button which is explained above . This is generally used in language , prize , quantity etc. fields in the websites when you are going to buy something through that website .
* In the above code you can see a line <input type = ''checkbox">Hindi<br> and <input type = "checkbox">English . These lines are used to select languages . These lines are different from the radio button which is explained earlier because these lines can take many inputs at a single time but the earlier one are not able to take many inputs at a single time .
Now the output of this code is given in the below image .
HOW TO TAKE ADDRESS FROM THE USER BY USING HTML?
In HTML you can take address from the user by using only a single line that is address:<textarea> </textarea> . This allowed you to write multiple lines . You can see in the below image how you can create this address block using html .This is the output of our code as you can see in the image given below .
HOW TO CREATE SUBMIT BUTTON BY USING HTML?
For creating submit button only one line is required to write which is given as <input type = "submit"> .
The output of the above image is given as in the below image .
We can change this button to another button like registration button by only giving its value .
The output of the above is given in the image which is given below .
HOW TO CREATE RESET BUTTON?
Reset is the button by which you can reset all the filled information in the form means all the previously filled information will be removed after clicking this reset button .for creating this you have to write <input type = '"reset"> .
In the above image as you can see i have already filled all information but if i will press reset button then it will show like this which you can see in the below image .
Let's use all the the attributes and create a complete registration form .
Now let's see output of this code .
Now , i think you are able to create your own form by using these attributes . These are the most essential attributes used in HTML to create different types of forms as you see in the daily life while creating gmail account or any other account .
I hope that you learned a lot through this blog post . If you liked this blog please like it and share it with your friends and please do follow my blog enggfact.blogspot.com .
*for learning how to create table using HTML please click here . (part 4)
*for learning image tag in HTML please click here . (part 3)
*basics of HTML (part 2) read here .
*basics of HTML (part 1) read here .
Thanks for reading this , hope you liked it .
Have a good day !
keep learning !


Dear Admin,
ReplyDeleteThis Blog Is Really Nice Blog Thanks For Sharing.
Dear Admin,
I am Ryan Mitchell Oregon. Very informative post! I am thankful to you for providing this unique information.
Ryan Mitchell Portland Oregon — A businessman (Ryan Mitchell Oregon) is a person involved in the business sector — in particular someone undertaking activities
Ryan Mitchell Oregon
Ryan Mitchell Portland Oregon
ryan mitchell rex putnam
Ryan Mitchell Oregon
Ryan Mitchell Portland Oregon
ryan mitchell rex putnam
Ryan Mitchell Oregon
Ryan Mitchell Portland Oregon
ryan mitchell rex putnam
Ryan Mitchell Oregon
Ryan Mitchell Portland Oregon
ryan mitchell rex putnam
Ryan Mitchell Oregon
Ryan Mitchell Portland Oregon
ryan mitchell rex putnam
Thanks for your feedback that you liked my post.
DeletePlease subscribe our blog for more interesting posts like this.